
Merge B-Form Pages Online (NADRA CRC)
Put two photos or pages of your NADRA B-Form (Child Registration Certificate) on one A4 page and download it as a PDF, JPG or PNG.
More Free Document Tools
Browser-side processing. Your files stay private.
ID & Document Utilities
⭐ Free Online B-Form Page Merger · Fast, Safe & Mobile Friendly
It is admission season, and the school asks for a copy of your child’s B-Form. You photograph it, and your phone gives you two pictures: one for the top half, one for the bottom, or one for each page. The upload box takes a single file.
This free tool puts both photos on one page. You can download it as a PDF, JPG or PNG. Everything happens in your browser, so your photos stay on your phone or computer.
The short version:
- Add the first photo, then the second.
- Look at the preview.
- Pick PDF, JPG or PNG and download.
What the B-Form is for
The B-Form is NADRA’s Child Registration Certificate, known as the CRC. It registers a child under 18. Parents usually need a copy for school admission, board exams or a passport application.
NADRA has announced a system where a child may receive a new B-Form at different ages. If that applies to your child, send the current one, not an old copy. Check the NADRA website if you are unsure which version is valid.
Why we did not use a card frame
Our other tools put ID cards on the page at real card size, 85.6 × 54 mm. That makes sense for a card. A B-Form is a paper form, and it can be tall, wide or somewhere in between, depending on how you photographed it.
So here the default mode is Fit to my photos. Each photo keeps its own shape, and the tool makes the two of them as large as the page allows. A tall photo stays tall, and a wide one stays wide. Nothing is stretched or cut.
If you prefer fixed frames, the settings also offer an A5 frame and a card frame.
How to merge B-Form pages
Merging takes about a minute. Here is each step.
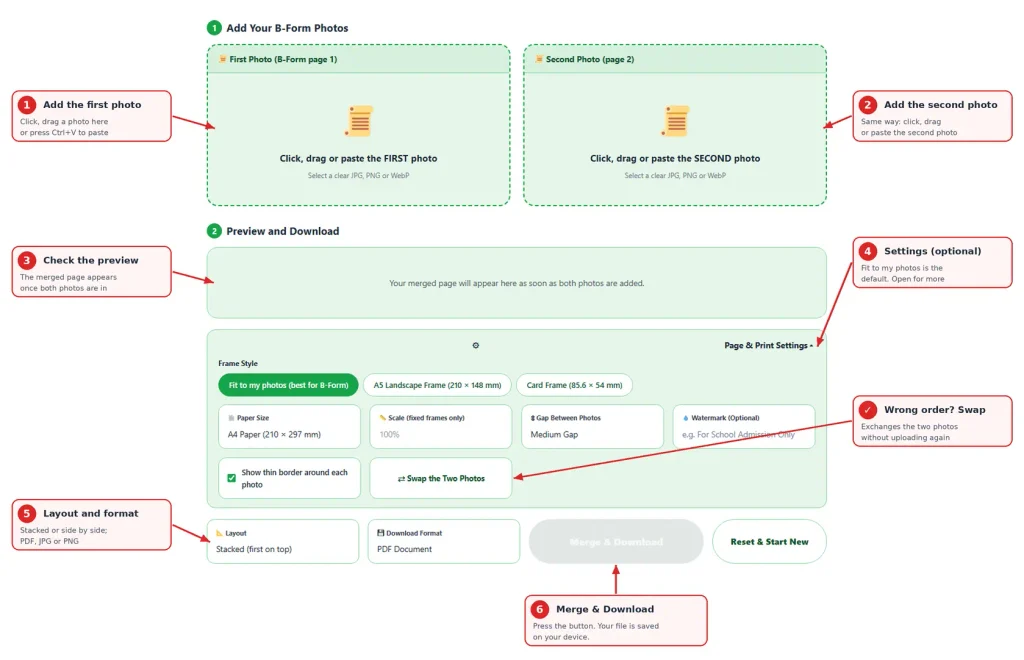
- Click the first box and choose a photo from your device. You can also drag a file into the box or paste a copied image with Ctrl+V. JPG, PNG and WebP all work.
- Do the same in the second box. If the photos went into the wrong boxes, press Swap the Two Photos. You do not need to upload them again.
- The merged page appears as soon as both photos are in. Zoom in and check that every name, number and date is readable. If something looks blurry, retake that photo, because the merge cannot add detail that is not in the picture.
- Open Page & Print Settings only when you want something different, such as a watermark, a different paper size or a smaller gap between the photos. The default mode, Fit to my photos, works well for most B-Forms.
- Pick Stacked or Side by Side for the layout. Then choose PDF for printing and email, JPG for upload forms with a size limit, or PNG for the sharpest text.
- Press Merge & Download. The file is saved to your device, and your photos are never sent to a server.
What you can change
The settings stay closed until you open them, so a quick job stays simple. When you need more control, this is what each option does.
| Feature | What it does | When to use it |
|---|---|---|
| Fit to my photos | Gives each photo its own shape and makes both as large as the page allows | Best for a B-Form or any paper document. This is the default |
| Frame style | Switches to a fixed A5 frame or a card-sized frame | Use only if you want every photo in the same box |
| Paper size | A4, Letter, A5, or “Fit Photos Only” | Choose “Fit Photos Only” for a tight page with no extra white paper |
| Layout | Stacked (first on top) or side by side (first on left) | Stacked suits tall photos on portrait paper. Side by side suits wide photos |
| Gap between photos | None, small, medium or large | Medium works well if you plan to cut the page |
| Thin border | Draws a light line around each photo | Switch it off when a portal wants a clean image |
| Watermark | Writes your own short text across each photo | Add the purpose and date, for example “For school admission only” |
| Swap the two photos | Exchanges the first and second photo | Use it when they went into the wrong boxes. No need to upload again |
| Scale | Makes fixed frames 85%, 100% or 125% of their size | Works only with the A5 and card frames. It stays off in “Fit to my photos” mode |
| Download format | PDF, JPG or PNG | PDF for printing and email, JPG for upload limits, PNG for the sharpest text |
Two things work without any settings: you can drag a file into a box or paste a copied image with Ctrl+V, and the merged page is always made at 300 DPI.
A walk-through
Say you have two phone photos of the B-Form.
Tap the first box and choose the first photo. Tap the second box and choose the second one. As soon as both are in, the merged page appears below. If the pages are in the wrong order, press Swap the Two Photos. You do not need to upload them again.Now look at the preview. Zoom in and check that the names, numbers and dates are readable. If something is blurry, retake that photo, because the merge cannot add detail that is not in the picture.
Finally, choose the format. PDF is a safe choice for printing and email. JPG gives a smaller file for upload forms with limits. PNG gives the cleanest text but the biggest file. Press Merge & Download. If the file turns out too big for a portal, our image size reducer can shrink it.
Stacked or side by side
- Stacked puts the first photo on top and the second below. For most tall photos on a portrait A4 page, this gives the largest result.
- Side by side puts them next to each other. Use it when your photos are very wide, or when you plan to print on landscape paper.
- You can change the layout in the bar at the bottom of the tool and watch the preview change.
Photographing a paper form
A paper form is easier to read than a plastic card, but a few habits still help.
- Lay the form flat on a table. Press down the corners if they curl.
- Stand over it and keep the phone parallel to the paper.
- Light it from the side, or use daylight. Avoid the shadow of your phone or hand.
- Keep all four edges inside the frame.
- If you have a scanner app, use it. Its edge detection saves a lot of cropping.
Handling a child’s document
A B-Form carries a child’s name, date of birth and the parents’ details. Treat the copy with the same care as an adult’s ID.
Send it only to the school, office or portal that asked for it. If you want to leave a note on the copy, type a short purpose and date in the watermark box, for example “For school admission only, 14-10-20xx”. It appears across both photos in the preview.Keep the original file to yourself, and delete downloads from shared computers or internet cafes. If you ever need to hide a detail, our blur and redact tool can do that, but a school will normally need to see the full details.
One last look before you download
- Both photos are in the right order.
- Every name, number and date is easy to read.
- The thin border and the watermark, if you chose them, do not cover important text.
- The file type matches what the form accepts.
- You are sending it through an official email or portal.
Frequently Asked Questions
Yes. It is free and needs no sign-up.
No. The merge happens in your browser. Only the PDF option fetches a small helper file from a public library the first time, and your photos are not part of that request.
Photos are scaled to fit the page together. For larger photos, try the other layout, or use a bigger paper size if your form allows it.
You can add any two images. The tool gives each photo its own shape, so they can look different in size. For a card and a paper form, check the preview first.
This tool needs two photos. If you have a single page, you do not need to merge anything. Use our image size reducer if the file is too large.
Many do, but rules differ. Follow the instruction on the admission form.
The page is made at 300 DPI. PNG is lossless, and JPG and PDF use high quality compression. A blurry photo stays blurry.
Yes. Tap a box and choose a photo from your gallery or take a new one.